For the construction of small buildings and houses there is no need for a complex roof structure. As a design decision, the rafter system of a pitched roof can be adopted. The scheme is simplified, but some nuances appear.
Advantages and features of a single-slope system
The advantages include:
- simple calculation;
- reduction in the number of nodes and connections;
- simplified installation;
- reduced wood costs;
- stability in wind loads;
- maintainability.
When deciding to make such a roof with your own hands, it is necessary to take into account the following features:
- the need for the construction of high longitudinal walls of the building or special frames;
- the difficulty of using a roof space as an attic;
- the house or building should be located on the site so that in most cases the wind blows on the high wall of the building (you need to get acquainted with the wind rose of the construction area);
- the angle of inclination is adopted depending on the coating material used.
The scheme includes the following basic elements:
- two Mauerlat;
- rafter legs.
For large spans, a do-it-yourself device will require additional elements that unfasten the load-bearing beams and increase their bearing capacity:
- truss legs (struts);
- racks;
- runs;
- lying down;
- contractions.
All elements are made of softwood of the first or second grade. To choose the most suitable material correctly, you need to pay attention to the following points:
- cutting place (it is better to choose the northern regions);
- felling time (the tree felled at the end of winter - beginning of spring will be stronger).
System calculation
Before you start assembling the structure with your own hands, you need to make a calculation and choose the right cross-section for all the elements.
The roofing device is a responsible process in which mistakes cannot be made.
Depending on the width of the building and the required section of the rafter leg for the projected span, a constructive solution of the rafter system is selected.
Section selection
When a professional builder erects a house according to a pre-prepared project, two extreme conditions are calculated, which determines the height and width of the load-bearing beams according to two requirements:
- stiffness;
- strength.
When building a private house with your own hands, you can not perform the calculation, but you need to take into account the recommendations depending on the span. Rafters on a pitched roof are always layered.
- Span up to 4.5 meters. The scheme involves the use of solid rafter legs, without being unfastened by struts or racks. It is convenient to use if the attic is planned: it allows to increase free space due to the absence of intermediate supports. The recommended cross-section of rafters at a step of 0.6 m is 50x150 mm, for a step of 1.1 m an increase of up to 75x175 mm is required.
- Span up to 6 meters. In this case, it all depends on the angle of inclination and span. In some cases, the standard length of the board or bar is enough - 6 m. With a large angle of inclination and a span close to 6 m, you will need to join the rafters along the length. As additional support, they provide struts (rafter legs). At the junction of the strut to the rafter, the leg is joined along the length. The recommended section at a step of 0.6 m is 50x200 mm, at a step of 1.1 m - 100x200 mm.
- Span of more than 6 meters. In this case, you need to make intermediate racks that will take on part of the load and reduce the sagging of the beam. Correctly install the supports so that each span of the rafter leg is less than 6 meters. The calculation in this case is performed as for a multi-span beam, taking into account the intermediate supports. When building with their own hands, the section is taken in the same way as for a span of up to 6 m (previous paragraph). In this case, all rafters are composite.
If it is planned to lay insulation between the rafters with your own hands (warm attic, attic), then the calculation takes into account the minimum height of the beams.
The thickness of the insulation should not be greater than the height of the rafter legs for polyurethane foam, polystyrene and extruded polystyrene foam.
If it is planned to lay mineral wool, then an additional 5 cm ventilation gap is taken into account. Partially, it is provided by load-bearing beams, and partly by a counter-lattice that is mounted on top of them.
Beam pitch selection
The step of the rafters depends on the following factors:
- roof load and span;
- type of thermal insulation material;
- the presence of skylights.
In the first case, the dependence is inversely proportional. The design of a shed roof involves a reduction in the pitch of the rafters with an increase in span or load. For the type of insulation, the following recommended values of the distance between the rafters in the light (clean) can be given:
- polystyrene and extruded polystyrene foam - 0.6 m;
- mineral wool - 0.58m;
- polyurethane foam - the step does not depend on the insulation.
When designing the attic and using dormer-windows as light sources, it will be required in the places of their installation to provide the step of the rafters 4-6 cm greater than the width of the window.
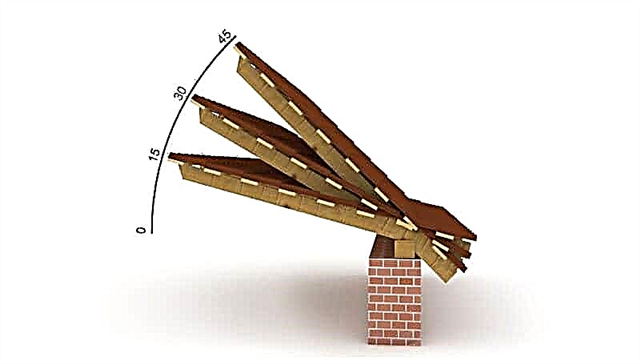
Tilt angle
Depending on the type of roofing used, it is allowed to take different angles of inclination of the roof slope. Below are the values for the most common materials. It is important to remember that the steeper the ramp, the less chance of leakage and load on the elements, but this complicates the construction and requires the construction of a high longitudinal wall.
- Ceramic tile. The optimum angle of inclination is 30-45 degrees, permissible - 12-65 degrees.
- Bituminous (soft) tile. Optimum - 20-45 degrees, acceptable - from 6 degrees.
- Metal tile. Optimum - 20-45 degrees, acceptable - from 12 degrees.
- Galvanized steel roofing. Allowed - from 14 degrees.
- Slate. Allowed - 6-27 degrees.
The smaller the angle of inclination, the lower the consumption of materials for construction, but this increases the load on the roof and the likelihood of leaks.
Work order
After the calculation is completed, they begin to purchase the material and assemble the structure.
- Processing elements with an antiseptic. It can be done already after installation in the design position, but if you plan to store wood, you need to process it immediately after purchase.
- Waterproofing of contact places of materials with various properties. In the place of laying the Mauerlat on a brick or concrete wall, you need to lay a layer of roofing material, linocrom or hydroisol.
- Laying the Mauerlat and fixing it to the wall. Can be performed on wire, staples, studs, anchor bolts.
- Laying rafters. Fastening them to Mauerlat. It can be fastened with brackets, nails or angles to the screws.
- Installation of waterproofing and lathing.
- Laying insulation.
- Roofing
- Installation of the lower lathing and ceiling lining.
It is important to correctly select the scheme of a single-pitch roof, section of elements, rafter pitch and angle of inclination. Compliance with do-it-yourself technology will ensure reliability and durability of the structure.